Designing for the View: How to Maximize Your Hill Country Landscape in Your Custom Home
📌 Key Takeaways
The horizon you love isn't just scenery—it's the reason you chose your Hill Country lot, and every design decision should protect and enhance that view.
Site Analysis Drives Floor Plans, Not Vice Versa: Map your property's sightlines and sun paths first, then adapt room placement to capture what the land offers rather than forcing a generic layout onto terrain that won't support it.
Window Orientation Reduces Glare and Cooling Loads: South-facing glass is easiest to shade with overhangs, while east and west exposures demand fins, extended projections, or strategic landscaping to intercept low-angle sun before it creates afternoon heat and glare.
Composition Matters as Much as Size: Mullion placement, sill heights aligned with seating, and proportions that mirror natural landscape rhythms transform a window wall from mere glass into a deliberate frame for the ridge line or valley beyond.
Passive Strategies Keep Views Comfortable Year-Round: Deep overhangs, cross-ventilation, spectrally selective low-E coatings, and shaded outdoor rooms allow you to enjoy panoramic glass without sacrificing comfort or driving up energy costs.
View Decisions Lock Early in the Build Sequence: Siting, finished floor elevations, and glazing specs must be confirmed before structural engineering and framing begin, making early coordination with architects and builders essential to avoid costly redesigns.
Plan with intention, and the view becomes a daily ritual rather than a missed opportunity.
Families planning custom Hill Country homes will find a strategic framework here, preparing them for the detailed design decisions that follow.
When you've chosen your Hill Country lot, you've already made one of the most important decisions—you've selected the horizon you'll wake up to every morning. But here's what separates a home with a view from a home designed for the view: strategic planning that positions every primary room, window wall, and outdoor space to capture what you love while managing the realities of Texas sun, heat, and privacy.
A Hill Country view-first custom home is a site-responsive design that positions primary rooms, window walls, and outdoor living to capture key sightlines while managing sun, heat, and privacy. Think of your lot like a natural amphitheater—the house is the stage, but the star is the horizon; every seat (room) gets a great sightline. Picture stepping into your great room at sunset, where the window wall frames the ridge line like a living painting—glare is tamed and comfort is effortless. This outcome begins with a view map and sun-path study, then translates into floor plan placement, rooflines, overhangs, and glazing specs that balance vistas, comfort, and efficiency.
A View-First Plan Begins with the Site (Not the Floor Plan)
Most people start with a floor plan they love and try to fit it onto their property. That approach often forces compromises that diminish the very views they purchased the land to enjoy. The smarter sequence reverses this: study the site first, identify your best sightlines and solar exposure, then adapt the floor plan to work with—not against—what the land offers.
Map Sightlines & Sun Paths to Choose Primary Room Placement
Walk your property at different times of day and mark where the most compelling views reveal themselves. Note which vantage points capture distant ridge lines, which overlook valleys or water features, and where tree canopies might frame—or obstruct—key sightlines. Sketch what the eye wants to see from each location, noting near, mid, and far focal elements: a live oak canopy, a limestone outcrop, a distant ridgeline.
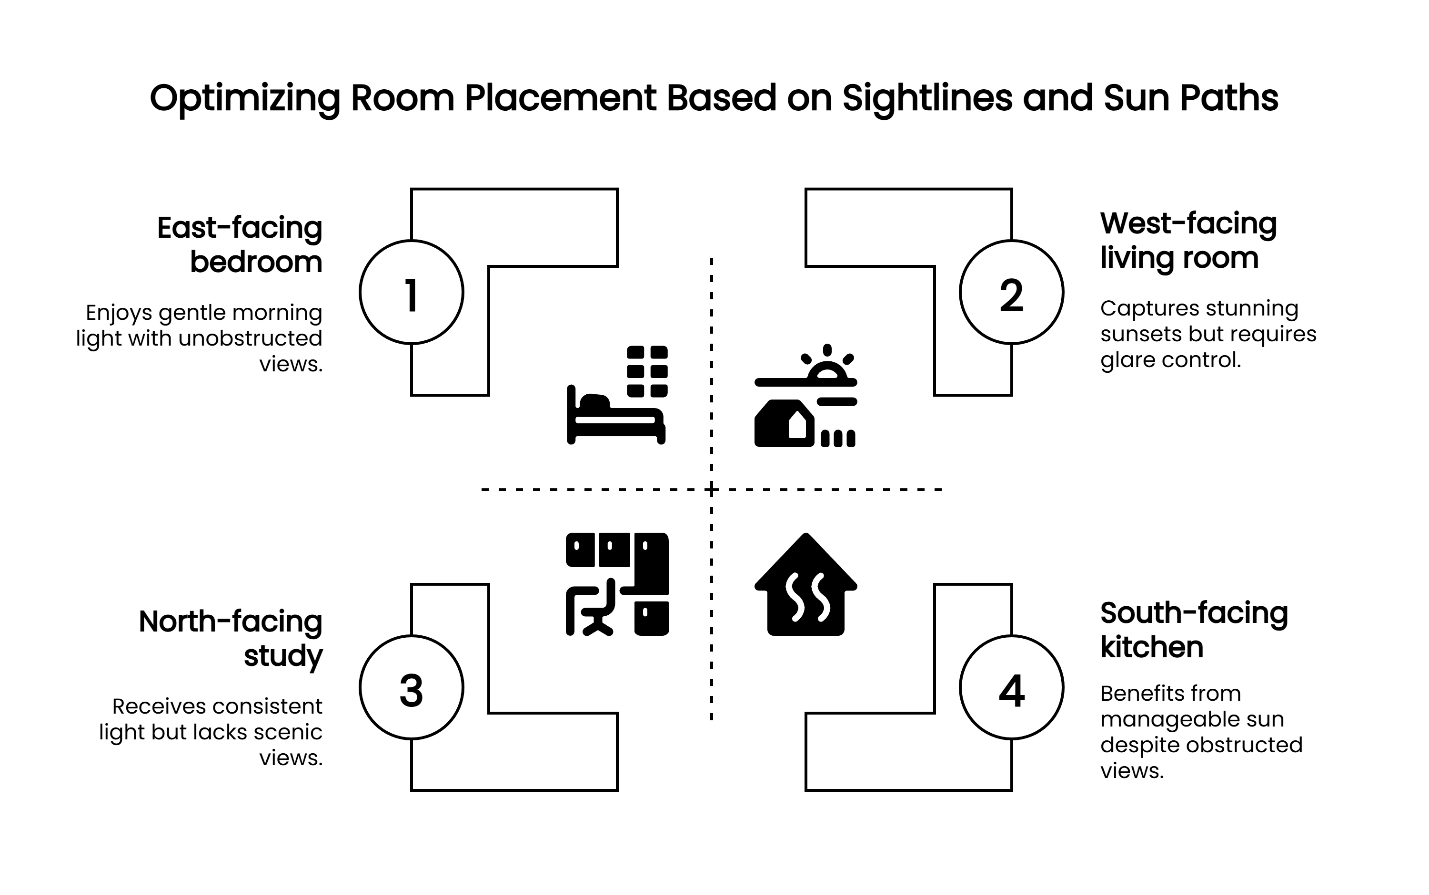
Equally important is tracking the sun's path across your site throughout the day and across seasons. Overlay this solar pattern with your view corridors to understand where morning light enhances a vista and where afternoon sun might create glare. Window orientation reduces glare and cooling loads. South-facing glass receives consistent, manageable sun that's easier to shade with properly sized overhangs. West-facing windows, however, catch low-angle afternoon sun that creates intense glare and heat gain—exactly when your home is already warmest. East exposures bring gentle morning light but require thoughtful shading by mid-morning in summer months.
Once you understand these patterns, you can position your great room, primary bedroom, and other key spaces where views and comfort align naturally. Texas Hill Country custom home builders who prioritize this site-first approach often discover opportunities that generic plans would miss entirely.
Set Grade, Approach, and Entry Moments to "Reveal" the View
How you enter the home shapes the first impression and sets up the visual narrative. This is what designers call arrival sequencing—the deliberate choreography of how the landscape unfolds as you approach and enter. Rather than placing the front door where it offers an immediate, full view, consider creating a sequence that builds anticipation. An entry that opens to a transitional foyer or hallway, then releases into a great room with a dramatic window wall, makes the reveal more impactful.
Grade and topography work together here. If your lot slopes, you might enter at a mid-level and step down into main living spaces that open to the view, or enter from below and step up to capture elevated sightlines. Adjust finished floor elevation and driveway approach so the landscape unfolds rather than bursts at the threshold. The key is using the natural contour to enhance, rather than fight, the visual experience.
Respect HOA & Topography Constraints While Preserving Corridors
Siting along contour preserves view corridors and privacy. Many Hill Country neighborhoods have setback requirements, height restrictions, and architectural review standards that influence where and how you can build. Rather than viewing these as obstacles, treat them as parameters that help define your strategy.
Topography introduces its own constraints—steep slopes may limit where you can build cost-effectively, while mature trees worth preserving can narrow your options. The goal is to identify view corridors that remain viable after accounting for these factors, then position the home to maximize those unobstructed sightlines. Sometimes this means angling the house slightly off the lot lines or shifting the footprint to work around a cluster of protected oaks. Low, linked pavilions typically protect views better than a single bulky mass.
For guidance on turning these site realities into a buildable plan, explore how to translate your dream home vision into a functional design plan.
Orientation, Glare & Heat: Comfort Makes the View Livable
A window wall that's unbearable to sit near for half the day isn't truly capturing the view—it's wasting it. Comfort and visual access must work together, which means managing solar heat gain and glare through strategic orientation, shading, and glass selection.
Why Window Direction, Overhangs, and Glass Specs Control Glare
Direct sun creates two problems: excessive heat and glare that makes screens unreadable and seating uncomfortable. The solution isn't to avoid windows on certain exposures—it's to design the right combination of orientation, shading, and glazing performance for each exposure.
Overhang design enables passive comfort on east/west glazing. Deep overhangs work exceptionally well on south-facing glass because the sun's high summer angle allows the overhang to block direct rays while the lower winter sun penetrates for natural warmth. East and west windows require different strategies since the sun approaches from a lower angle at those times of day. Extended overhangs, vertical fins, or even strategic landscaping can intercept that low-angle light before it floods the interior. For detailed guidance on sizing and positioning these solar control devices, the National Institute of Building Sciences offers comprehensive fundamentals on shading strategies that apply directly to Hill Country conditions.
The U.S. Department of Energy provides detailed guidance on passive solar design principles, including overhang sizing calculations based on latitude and window orientation, which is particularly relevant for managing Texas Hill Country's intense summer sun.
Cross-Breezes, Overhangs, and Shade: Passive Comfort Wins
Mechanical cooling is essential in Texas, but passive strategies reduce how hard your HVAC system works. Positioning operable windows to capture prevailing breezes—typically from the southeast in this region—creates natural ventilation that makes indoor spaces more pleasant during moderate weather.
Combining these breezes with effective shading keeps indoor temperatures more stable. Overhangs, as mentioned, prevent direct sun from hitting glass. But don't overlook the impact of exterior shading—pergolas, covered porches, and even shade trees positioned on the west and southwest sides of the home can dramatically reduce afternoon heat gain. Shaded verandas and deep porches cool adjacent rooms while preserving the primary sightlines through strategic placement.
When to Use Low-E Coatings and Performance Glazing

Not all glass performs the same. Standard clear glass allows significant heat transfer, which works against you on exposures with intense sun. Low-emissivity (low-E) coatings reflect infrared heat while allowing visible light through, reducing cooling loads without darkening the view. Spectrally selective coatings represent an advanced variation that offers even finer control over which wavelengths pass through.
For west-facing window walls or any glazing that receives prolonged direct sun, specifying low-E glass with a low solar heat gain coefficient (SHGC) makes a measurable difference in comfort. The tradeoff is cost—performance glazing adds to the budget—but it's often the difference between a window wall you avoid during afternoons and one you can enjoy all day. For a comprehensive overview of how different coatings and glass types perform, the U.S. Department of Energy's guide to energy-efficient windows explains the technical specifications in practical terms.
Compose the Window Wall: Frame a Living Landscape
Once orientation and shading are resolved, the next decision is how to compose the window itself. The goal isn't just to maximize glass area—it's to create a frame that directs the eye to what matters most while maintaining proportions that feel intentional rather than haphazard.
Mullion Strategy & Proportions for "Picture-Frame" Vistas
Large expanses of uninterrupted glass create the most dramatic views, but they also introduce structural and cost considerations. Mullions—the vertical and horizontal members that divide window units—are often necessary for span and structural support, but their placement affects how you perceive the view.
Horizontal mullions at seated eye height (roughly 42–48 inches from the floor) can interrupt sightlines when you're sitting. If your budget allows, minimizing or eliminating mullions at this height keeps the view clean. When mullions are necessary, spacing them to align with natural break points in the landscape—such as the horizon line or the transition between foreground and distant hills—makes them feel less intrusive. Favor fewer, larger panes where feasible, and align verticals with existing visual rhythms like tree trunks or porch posts so the structure feels deliberate rather than arbitrary.
Consider how modern versus traditional architectural styles influence window proportions and mullion strategies, especially for lakefront or hillside properties where framing the view is central to the design.
Sill Heights & Seating Alignments That Cue the Eye
Sill height—the distance from the floor to the bottom of the window—determines what you see from various positions. Standard residential windows often have sills at 36 inches or higher, which works fine for standing views but cuts off the landscape when seated.
Lowering the sill to 18–24 inches allows you to enjoy the full view from a sofa or dining chair. For spaces where you'll spend significant time seated—living rooms, breakfast nooks, primary bedrooms—this adjustment makes a tangible difference in how you experience the space. In lakeside custom homes, consider a reading ledge or built-in seating at the glass line to make the panorama feel inhabitable, not just observed. Just ensure the lower sill height doesn't compromise privacy or create safety concerns if the window is near a drop-off.
Align furniture placement with these sightlines. Position seating to face the primary view rather than forcing people to twist or crane their necks. When the architecture and furniture work together, the view becomes a natural focal point rather than something you have to work to appreciate.
Privacy & Neighbors: Angle Solutions That Keep the View
Hill Country lots vary in size and proximity to neighbors. Even on larger parcels, you may have sightlines that capture both your desired vista and a neighbor's home or patio. Rather than sacrificing the view or adding heavy window treatments, consider angling the window wall slightly away from the intrusive sightline.
A subtle shift—rotating the wall just 10 to 15 degrees—can redirect the primary view toward open landscape while maintaining privacy. Strategic landscaping, such as a row of native grasses or a cluster of evergreen shrubs, can also screen specific problem areas without obstructing the broader vista. The goal is selective filtering: keep what you want, obscure what you don't, and maintain a sense of openness.
Outdoor Living That Extends the View (Without Heat Penalty)
Your view doesn't stop at the glass. Thoughtfully designed outdoor spaces extend sightlines and create additional vantage points for experiencing the landscape. The challenge is doing this without creating spaces that are too hot, too exposed, or too uncomfortable to actually use.
Position Porches, Pool, and Dining for Shade + Sightline
Covered porches and patios should be positioned to capture the view while providing relief from direct sun. A porch on the west side of the home, for example, needs substantial depth or a secondary structure like a pergola to create usable shade during late afternoon hours.
Pools and outdoor dining areas benefit from being oriented to face the best vistas, but they also need consideration for sun exposure and prevailing winds. A pool deck that's fully exposed to afternoon sun will be uncomfortable for lounging. Positioning the pool perpendicular to the horizon allows the water to reflect the sky without creating glare toward interior spaces—a subtle orientation choice that enhances both the view from inside and the experience of being in the pool. Outdoor dining terraces work best in partial shade with just enough openness to keep the panorama intact.
For detailed strategies on creating seamless indoor-outdoor transitions that enhance rather than compromise comfort, review integrating outdoor living spaces in custom homes.
Guardrail Heights, Railing Types, and View Preservation
If your lot has elevation changes, code-required guardrails become part of the view composition. Standard guardrails at 42 inches can obstruct sightlines when you're seated on a deck or patio. Where possible, use cable railings, tempered glass panels, or slim vertical bars that maintain safety while minimizing visual interruption.
The goal is to meet structural and safety requirements without creating a visual barrier that defeats the purpose of the elevated deck. When designed thoughtfully, railings become a subtle frame rather than an obstruction.
Night Lighting for Depth & Safety Without Glare
Exterior lighting serves two purposes: safety and ambiance. Path lights, step lights, and low-level accent lighting make outdoor spaces functional after dark. But poorly positioned lights create glare that reflects off windows and obscures the view you've worked so hard to capture.
Use shielded, downward-facing fixtures that illuminate walking surfaces without creating bright spots that compete with the landscape. Accent lighting on key landscape features—a specimen tree, a stone outcropping—adds depth and draws the eye beyond the immediate foreground. This layered approach prevents windows from becoming mirrors at night, maintaining visual connection to the landscape even after sunset. The result is a layered nighttime view that feels intentional rather than washed out by floodlights.
For guidance on layering interior and exterior lighting to enhance rather than compete with views, see luxury home lighting design tips and trends.
Budget & Build Factors: What Affects Cost and Timing
View-forward design introduces specific cost and schedule considerations. Understanding these early helps you make informed tradeoffs and avoid surprises during construction.
Structural Spans, Soils & Hillside Loads That Shape Feasibility
Large window walls require structural support that can span wider openings without intermediate posts or columns. Steel beams, engineered lumber, or reinforced concrete lintels add cost but are often necessary to achieve uninterrupted views. The wider the span, the more substantial—and expensive—the structural solution becomes.
Hillside lots introduce additional complexity. Soils on slopes may require deeper foundations, retaining walls, or specialized drainage systems to manage water runoff and prevent erosion. These factors don't eliminate view-first design, but they do influence the budget and the engineering required to make it feasible. "Riverbend listened and brought our vision to life—beyond what we imagined," notes Christine G. in her Google review, highlighting the importance of working with builders experienced in navigating these site-specific challenges.
Permits/HOAs That Influence Placement & Glass Area
Local building codes regulate setbacks, height limits, and structural requirements. Homeowners' associations often add architectural review standards that govern materials, colors, roof pitch, and overall aesthetic. Some HOAs limit glass area as a percentage of total wall area or restrict specific window styles.
Understanding these requirements upfront prevents costly redesigns after you've committed to a concept. The permit and approval process takes time—sometimes several weeks or months depending on jurisdiction and HOA responsiveness—so factor this into your schedule.
Sequencing: When View Decisions Must Be Locked to Stay on Schedule
Certain decisions must be finalized early to keep the build moving smoothly. Siting and orientation need to be confirmed before foundation work begins, as these establish the finished floor elevations and view corridors that drive all subsequent choices. Window and door specifications, including sizes, glass performance, and framing details, should be locked before framing starts since last-minute changes create delays and add cost. Exterior shading devices—overhangs, trellises, pergolas—need early coordination with roof and façade packages to avoid redesigns.
Understanding the critical milestones where view-related decisions become locked helps you prioritize what to finalize first. For a comprehensive breakdown of how these decisions fit into the overall building timeline, review key milestones in your custom home journey.
Conclusion: Turn Your Favorite Horizon Into a Daily Ritual
You didn't choose the Hill Country for its convenience or its mild climate—you chose it for what you see from your property. A view-first design ensures that what drew you to the land remains the centerpiece of your daily experience, not something you appreciate only in passing.
This approach requires planning, tradeoffs, and attention to details that generic floor plans ignore. But when you step into your completed home and the window wall frames exactly what you envisioned, when you can sit comfortably on a summer afternoon without squinting or overheating, when your outdoor spaces extend rather than interrupt the sightline—that's when the investment in thoughtful design proves its worth.
The horizon you loved on your first site visit becomes the backdrop to your morning coffee, your evening conversations, and the countless small moments that define home. That transformation from a piece of land to a carefully framed daily ritual is what site-responsive design delivers.
Resources
Integrating Outdoor Living Spaces in Custom Homes — extending view lines outdoors
Modern vs. Traditional: Choosing the Right Architectural Style for Your Lakefront Home — massing and façade choices that affect view framing
Luxury Home Lighting: Design Tips and Trends — nighttime layering to preserve sightlines without glare
From Foundation to Finishes: Key Milestones in Your Custom Home Journey — when view decisions lock in the schedule
How to Translate Your Dream Home Vision into a Functional Design Plan — turning "must-see" views into plan constraints
Our Editorial Process
Our expert team uses AI tools to help organize and structure our initial drafts. Every piece is then extensively rewritten, fact-checked, and enriched with first-hand insights and experiences by expert humans on our Insights Team to ensure accuracy and clarity.